How to Build a Dynamic Scroll-Driven Video Background
Turn an AI-generated video into a background that transforms as visitors scroll through your page. The background isn't decorative; it's narrative.
🎬 Prefer a video? Watch the full narrated walkthrough below, or scroll down for the step-by-step written tutorial.
✍️ Note from the Creator
Most websites treat backgrounds as static wallpaper. An image behind the text, maybe a parallax effect if someone's feeling ambitious. That's fine for a portfolio site. But if you're building something immersive, a world someone should feel they're entering, you need the environment to respond to the visitor.
This tutorial covers the technique I used for The Roar of Winchester. When a visitor scrolls through the site, the background isn't static. In the "Collapse" variant, a command center explodes and disintegrates as you read. In the "Rebirth" variant, a sun rises over a city at dawn. The background becomes part of the storytelling.
The core innovation here is the video loop background, which is the technique of converting an AI-generated video into a sequence of frames and mapping them to scroll position. The rest (CSS, page layout, overlay opacity) is standard web development. I'll include it for completeness, but the video-to-scroll pipeline is the part worth paying attention to.
Prerequisites
- An AI video generation tool (Google Veo 3 recommended, though Kling, Luma, or Runway will work)
- ffmpeg for extracting video frames
- Basic HTML/CSS/JavaScript knowledge
- A web server to host the frames (each set is 15-35MB total)
<video autoplay muted loop> plays at its own pace regardless of user behavior. The scroll-driven approach gives you precise control: the video progresses exactly in sync with how far the user has scrolled. Frame 1 at the top, frame 192 at the bottom. The user controls the narrative pace.What You'll Build
Here it is in action. Watch how the background transforms from an intact command center to full destruction as the page scrolls:
The technique is simple in concept: a full-page background that transitions through a video sequence as the user scrolls. At the top of the page, the background shows the first frame. As the user scrolls to the bottom, it smoothly transitions through all frames to the final state.
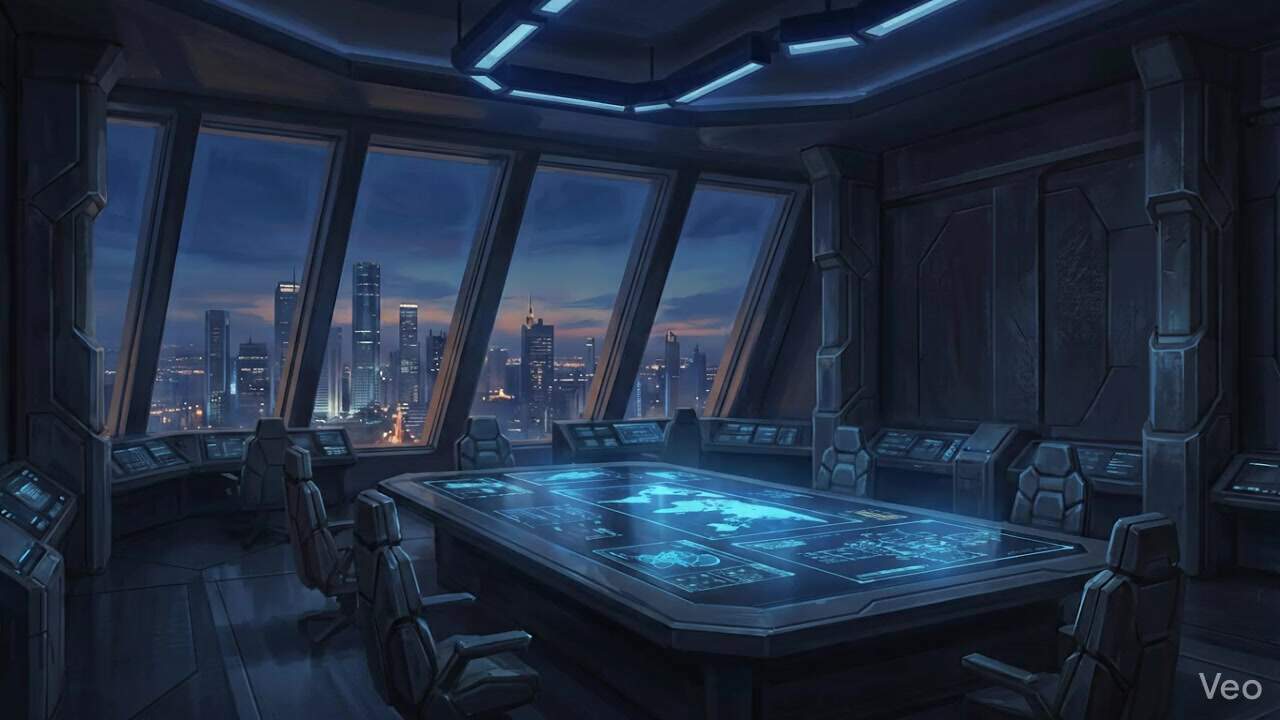
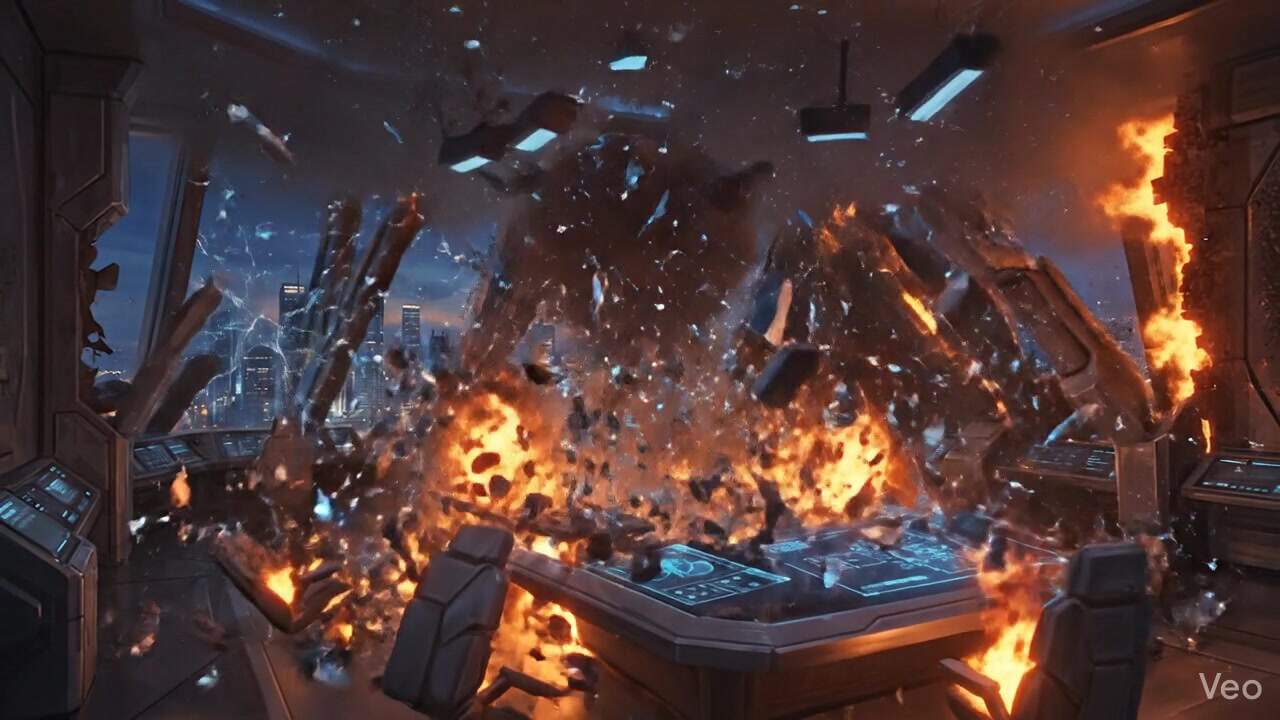
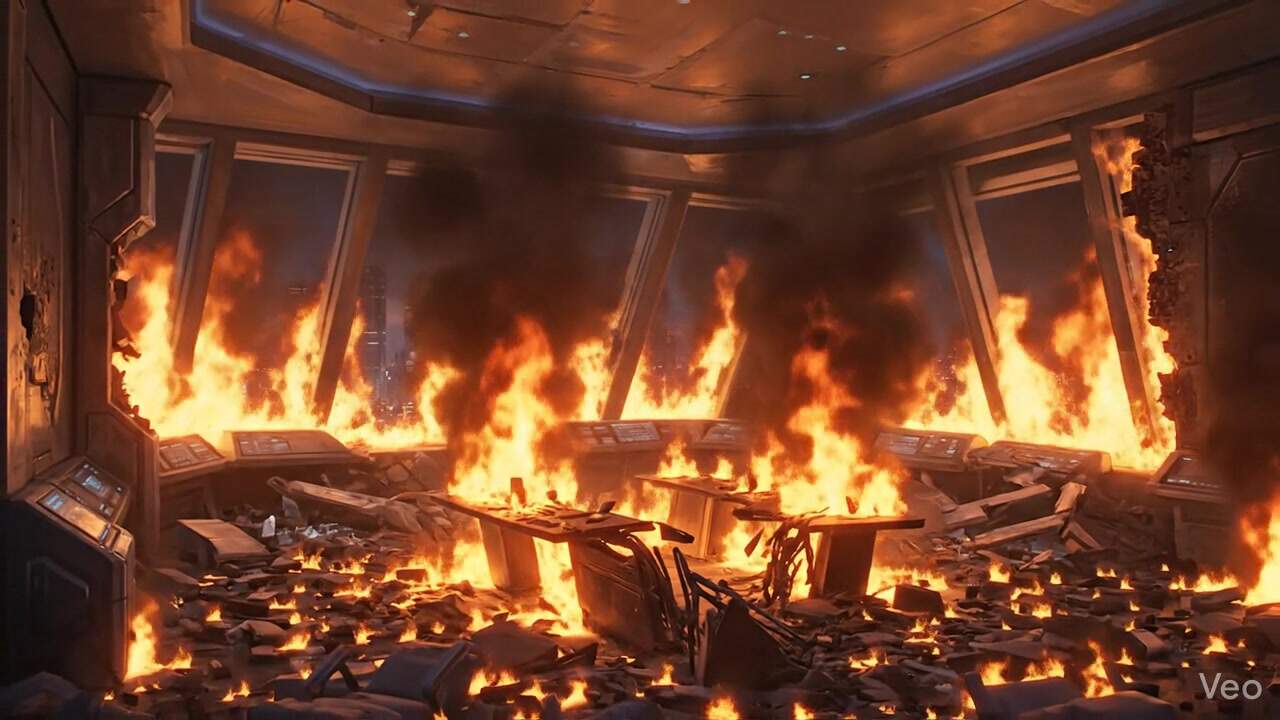
This is from the "Collapse" variant. Frame 1 shows a futuristic command center intact. By frame 192, it has been destroyed. The visitor experiences the destruction by scrolling through the page content.
1 Generate the Video Loop
The process starts with generating a short video (5-10 seconds) using an AI video generation tool. The video should show a continuous transformation: something building, something destroying, a time-of-day change, weather shifting, or any gradual visual transition.
Aim for 5-8 seconds of video. Longer videos produce more frames and smoother scroll transitions, but increase total file size. Our production implementation uses 192 frames extracted from an 8-second Veo 3 generation.
2 Extract Frames with ffmpeg
Once you have your video, extract individual frames as JPEG images. This is the bridge between a video file and scroll-driven control.
# Create output directory
mkdir -p temporal-frames

# Extract all frames as sequentially numbered JPEGs
ffmpeg -i collapse-video.mp4 -q:v 3 temporal-frames/frame_%04d.jpg
The -q:v 3 flag controls JPEG quality (2-5 is the sweet spot; lower = higher quality = larger files). The %04d pattern produces frame_0001.jpg, frame_0002.jpg, etc.
Optimize the frame count
A 24fps video produces 24 frames per second. For an 8-second video, that's 192 frames. This works well. If your video is longer, you can reduce the frame rate:
# Extract at 12fps instead of native framerate (halves frame count)
ffmpeg -i your-video.mp4 -vf "fps=12" -q:v 3 temporal-frames/frame_%04d.jpg
Optimize file size
Each frame should be as small as possible without visible degradation. For a full-screen background, 1280px wide is sufficient. Resize during extraction:
# Extract, resize to 1280px wide, and compress
ffmpeg -i your-video.mp4 -vf "scale=1280:-1" -q:v 4 temporal-frames/frame_%04d.jpg
3 The Scroll Engine (The Innovative Part)
This is the core of the technique. The scroll engine maps the user's scroll position to a frame index, then swaps the background image. It uses requestAnimationFrame for smooth performance and a two-phase loading strategy so the page doesn't wait for all 192 frames before displaying anything.
(function() {
  var bg = document.getElementById('temporal-bg');
  var totalFrames = 192;
  var frames = new Array(totalFrames);
  var ready = false;
  var lastIdx = -1;
  var ticking = false;

  // Generate frame file paths
  function pad(n) { return String(n).padStart(4, '0'); }
  function src(i) { return 'temporal-frames/frame_' + pad(i) + '.jpg'; }

  // ==========================================
  // PHASE 1: Load first 10 frames immediately
  // ==========================================
  // This gets the background visible in under 1 second
  // while the remaining 182 frames load in the background.
  var phase1 = 10;
  var p1loaded = 0;

  for (var i = 1; i <= phase1; i++) {
    (function(idx) {
      var img = new Image();
      img.onload = function() {
        frames[idx - 1] = img;
        p1loaded++;
        if (p1loaded === phase1) {
          // First 10 frames loaded - activate the background
          bg.src = frames[0].src;
          bg.style.display = 'block';
          document.body.classList.add('temporal-active');
          ready = true;
          loadRemaining(); // Start loading the rest
        }
      };
      img.src = src(idx);
    })(i);
  }

  // ==========================================
  // PHASE 2: Load remaining frames in batches
  // ==========================================
  // Loads 20 frames at a time with 50ms gaps to
  // avoid blocking the main thread.
  function loadRemaining() {
    var batch = 20;
    var cursor = phase1 + 1;
    function loadBatch() {
      var end = Math.min(cursor + batch, totalFrames + 1);
      for (var i = cursor; i < end; i++) {
        (function(idx) {
          var img = new Image();
          img.onload = function() { frames[idx - 1] = img; };
          img.src = src(idx);
        })(i);
      }
      cursor = end;
      if (cursor <= totalFrames) {
        setTimeout(loadBatch, 50);
      }
    }
    loadBatch();
  }

  // ==========================================
  // SCROLL HANDLER with rAF throttle
  // ==========================================
  // Maps scroll percentage to frame index.
  // requestAnimationFrame prevents layout thrashing.
  window.addEventListener('scroll', function() {
    if (!ready || ticking) return;
    ticking = true;
    requestAnimationFrame(function() {
      var scrollMax = document.body.scrollHeight - window.innerHeight;
      if (scrollMax > 0) {
        var pct = Math.min(1, Math.max(0, window.scrollY / scrollMax));
        var idx = Math.min(totalFrames - 1, Math.floor(pct * (totalFrames - 1)));
        if (idx !== lastIdx && frames[idx]) {
          bg.src = frames[idx].src;
          lastIdx = idx;
        }
      }
      ticking = false;
    });
  }, { passive: true });
})();
How it works
- Phase 1 (instant): Loads frames 1-10 immediately. The background activates as soon as these are ready (typically under 1 second).
- Phase 2 (background): Loads frames 11-192 in batches of 20 with 50ms pauses between batches. This prevents the image loading from blocking user interaction.
- Scroll mapping: On each scroll event, calculates what percentage of the page has been scrolled (0.0 to 1.0) and maps that to a frame index (0 to 191). Only updates the
<img>src when the frame index actually changes. - rAF throttle: The
requestAnimationFramewrapper ensures we only update once per display refresh (60fps max), preventing performance degradation from rapid scroll events.
4 Page Structure (Standard CSS)
The HTML structure is straightforward. The key elements are a fixed-position <img> for the background and a semi-transparent overlay so text remains readable. This is standard CSS, nothing novel here.
<!-- The scroll-driven background image -->
<img id="temporal-bg" src="" alt=""
     style="position:fixed; inset:0; width:100%; height:100%;
            object-fit:cover; z-index:-2; display:none;">

<!-- Semi-transparent overlay for text readability -->
<div style="position:fixed; inset:0; z-index:-1;
            background:rgba(5, 6, 10, 0.75);"></div>

<!-- Your page content goes here -->
<div class="content">
  <h1>Your Page Title</h1>
  <p>As the visitor scrolls through this content,
     the background transitions through the video frames.</p>
  <!-- Add enough content to create scroll depth -->
</div>
rgba(5, 6, 10, 0.75) value based on your content. More text-heavy pages need higher opacity (0.75-0.85). Image-focused pages can go lower (0.55-0.65). Our "Rebirth" variant uses 0.55 to let the dawn colors show through; "Collapse" uses 0.78 for readability over the bright explosion frames./* Hide the default body background when temporal bg is active */
body.temporal-active::before {
display: none !important;
}
/* Optional: style adjustments per theme */
body.theme-rebirth .overlay {
background: rgba(5, 6, 10, 0.55); /* lighter for dawn scene */
}
/* Standard scroll-triggered fade-in for content sections */
.fade-in {
opacity: 0;
transform: translateY(20px);
transition: opacity 0.6s, transform 0.6s;
}
.fade-in.visible {
opacity: 1;
transform: translateY(0);
}
The .fade-in class paired with an IntersectionObserver is a common pattern for revealing content sections as the user scrolls. It works nicely with the dynamic background since both respond to scroll position, creating a cohesive experience.
5 Performance Optimization
The two-phase loading strategy handles most performance concerns, but here are additional optimizations for production deployment:
Frame file size
- Target 50-100KB per frame at 1280px width
- JPEG quality 3-4 via ffmpeg is the sweet spot
- Total set should be under 35MB; ideally under 20MB
CDN and caching
- Serve frames through a CDN (Cloudflare, AWS CloudFront) with aggressive cache headers
- Set
Cache-Control: public, max-age=31536000since frame files never change - On repeat visits, all frames load from cache instantly
Mobile considerations
- The technique works on mobile with touch scrolling
- Consider serving smaller frames on mobile (640px vs 1280px) using a media query or JS detection
- Reduce frame count to 96 on slower connections using
navigator.connectionAPI
background-image. Swapping background-image on a fixed element triggers expensive repaints. Using an <img> element and changing its src attribute is significantly faster because the browser can optimize image decoding separately from layout.6 Deploy
Upload your frame directory alongside your HTML, CSS, and JavaScript. The file structure should look like this:
your-site/
  index.html
  scroll-engine.js
  temporal-frames/
    frame_0001.jpg
    frame_0002.jpg
    ...
    frame_0192.jpg
That's it. No build tools, no bundler, no framework dependencies. The scroll engine is 60 lines of vanilla JavaScript. It works in every modern browser.
⊞ How It All Fits Together
The complete flow:
- Generate: AI video tool creates a 5-8 second transformation video with a fixed camera
- Extract: ffmpeg splits the video into 100-200 individual JPEG frames
- Load: JavaScript loads the first 10 frames immediately, remaining frames in background batches
- Map: Scroll position (0%-100%) maps to frame index (1-192)
- Swap:
requestAnimationFrameupdates the background image src on each frame change - Experience: Visitor scrolls through your content while the world transforms behind them
The result is a website that feels alive. The background isn't decoration; it's synchronized to the visitor's journey through your content. Every scroll is a step further into the narrative.
? Troubleshooting
Background flickers or shows white gaps
This happens when the scroll moves faster than frames can load (Phase 2 hasn't finished). The frames[idx] check in the scroll handler prevents displaying unloaded frames. Increase Phase 1 to 20-30 frames if your page has minimal content above the fold.
Performance drops on scroll
Ensure you're using { passive: true } on the scroll listener. Without it, the browser waits for the handler to complete before scrolling, creating visible jank. Also verify the ticking flag is working. It should prevent multiple rAF calls from stacking.
Frames load too slowly
Reduce frame file size (increase JPEG compression), reduce frame dimensions, or reduce total frame count. If targeting global audiences, use a CDN. Our production frames average 89KB each and load all 192 within 3-4 seconds on a typical connection.
Camera movement in the video causes jumps
Regenerate the video with explicit "camera remains fixed" instructions. If the provider doesn't support fixed-camera well, try a different tool or use post-processing to stabilize the footage before frame extraction.
Built for The Roar of Winchester. See it in action: Collapse variant | Rebirth variant.